
It’s a new year. A fresh start. And From what we see at ITpipes, it’s going to be a busy year for those in the industry, so it’s best to take this time to get prepared. Do yourself a favor and take a couple hours and organize and do maintenance on your CCTV inspection system vehicle.
Chances are, you probably do the normal maintenance on your vehicle – change fluids, check safety equipment, and give it a good cleaning. But let’s talk about the most overlooked, but most important, part of your inspection system – your PC. It spends its life working day after day, bouncing around as you drive down the road, and you don’t think twice about it… until it doesn’t work anymore. So take 30 minutes and give it some love that will pay you back in dividends!
“Every year – especially when it starts to warm up outside – we have some clients who will send us their PCs for service that are so choked up with dust and grime that the PCs are overheating. We have also received some where the dust buildup was so heavy, it shorted out the components of the computer. This can often result in some expensive repairs and downtime of the vehicles or office systems. And, for those who don’t use cloud services, it could also mean a devastating loss of data as the overheating or shorting can cause damage to the storage devices.” says Cox. “Fifteen minutes and a $6 can of compressed air each year could eliminate most of these issues and keep your computers running smoothly through the season”.
Here are some of Brian’s tips to keep your pipe inspection PC in top shape:
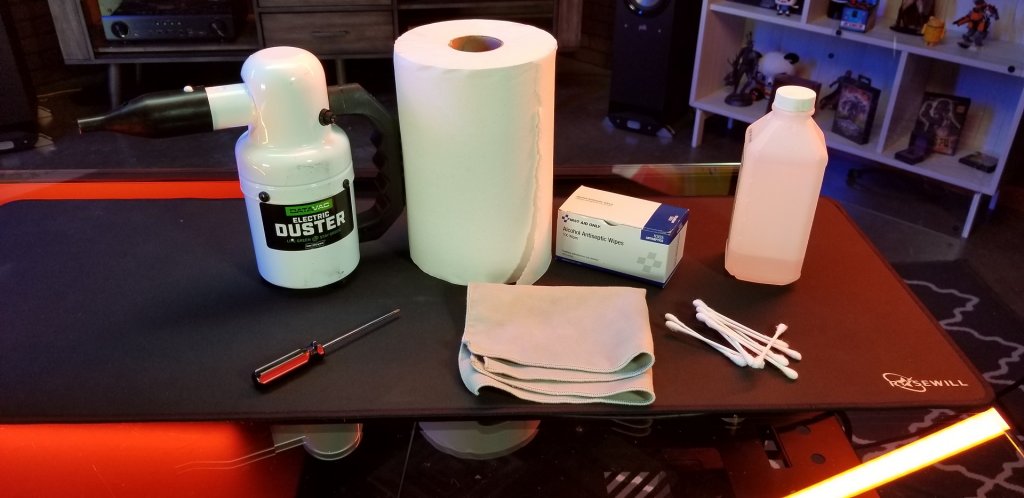
Step 1: Gather your materials. You’ll need a can of compressed air (do not use your shop compressed air – it often has too much moisture and can be too powerful), possibly a dust mask (especially if it’s been a while since the last cleaning), some cotton swabs, and some isopropyl alcohol (most first aid kits will have alcohol or alcohol wipes). Additionally, you may need miscellaneous screwdrivers (typically #1 and #2 Phillips) to remove the PC and open it up.
Step 2: Shut down the computer through the OS and unplug it. As you unplug the cables from the back, label them so you know where to connect them when you reinstall it. Snapping a few pictures of the back of the PC with your phone can be great insurance, as well.
Step 3: Remove the unit from the rack (if applicable) and open the case. This will vary depending on the manufacturer, but most of the time it is either thumb screws or phillips head screws that hold the cover on.
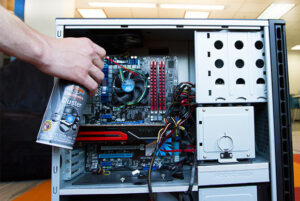
Step 4: Using the can of compressed air, dust the internal internal components of your computer with short bursts of air. Try to remain at least a few inches away from the surface of the motherboard, memory, processor, and expansion cards. If you’re not sure what those are, that’s no problem. Just dust what you can see.
Step 5. The Most Important Step. Remove the dust buildup on your case fan(s) with the can of compressed air. Most cases have a fan that blows cool air in and a fan that takes the hot air out. These little fans do some heavy lifting to help keep your PC from overheating. Hold the fan with your finger to keep it from spinning while you’re blowing the compressed air onto it. As tempting and fun as it can be, fan blades can be delicate and may crack if spun too quickly. You can use rubbing alcohol and wipe the blades with a cotton swab for the finishing touches. If the fans are hard to reach or extremely dirty, you can remove them fairly quickly to get a deeper clean.
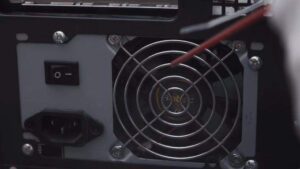
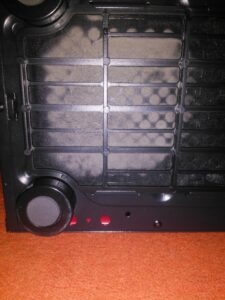
Step 6. Continuing on our path of helping keeping things cool, you’re going to want to hit the power supply with the compressed air. This is often located towards the front, and sometimes has a dust filter underneath it. Make sure to clean that, as well.
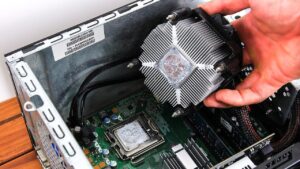
Step 7. You’ll see another fan inside your PC – it’s mounted on the processor. Just like how you cleaned the case fan, use short bursts of air and hold the fan steady. If needed, use a cotton swab to get the dust that the air can’t. Below the fan is the processor’s heat sink, which works like a radiator for your PC’s engine. You’re going to want to try to clean that with the compressed air, as well. If it has heavy dust build up, and if you’re comfortable doing so, remove the fan and heat sink to clean thoroughly. However, before reinstalling, you’re going to need to clean the heatsink and processor with alcohol and reapply the thermally-conductive grease (also known as heatsink compound or thermal paste) between the heat sink and processor. This is available at most computer, office supply, and electronics stores. Here’s an option that Best Buy stocks.

Step 8. Reassemble the case, reinstall in the rack, and reconnect all the cables. Power it up.
Step 9. Using your right arm reach across your body in an upward motion and pat yourself on the back for a job well done.

The first two people to send us pictures of you cleaning your PC (must include your face or your company vehicle) will receive ITpipes Hydroflasks. If you’re working to keep your PC cool, we want to help keep you cool.

Email your pictures to [email protected] . The dirtiest computer will win something extra!